Showing posts with label Vegetarian. Show all posts

Saturday, October 1, 2011

Apple Cider

I made the cider last week, but haven't gotten around to posting it until now... oops my bad.

After all was said and done, I had 500 grams of coarse pulp, 500 grams of fine pulp (first straining vs second straining, there was a distinct difference between them) and 2.5 liters of Apple Cider.

I had intended on spicing it by tossing in a cinnamon stick and some clove berries. But unfortunately I forgot about it until about 2 minutes into the canning process. I could have removed the jars and broken the seal. Though I wasn't sure if I would be able to use the lids again (One use only, they may not seal properly the second time and their dirt cheap). I didn't want to waste the lids so I just left them in the water until they were done being processed. Oh well, maybe next year.

The following is pictures of the haul this year.

ALL of these apples were from one tree in the city (the only tree to bear fruit for me)

These are all of the apples from my parents tree

5x500 mL jars were the total cider haul this year

Hard (course) pulp and Soft (fine) pulp, about 500 g each

Better lighting in this picture of the apple cider

Side shot to show the opacity of the juice!

Monday, September 19, 2011

Reheated Lasagna lunch

I recently made a vegetarian lasagna (I like meat as much as the next person, but I've had lots of good meat Lasagnas, but never a great one, while I have hat lots of great meatless ones). Nothing special, I tried a few new things and it turned out really well. Probably one of the best ones I've made recently. But those are trivial details compared to how I have discovered how to reheat it for lunches!

My problem was that, Lasagna, doesn't do very well in the microwave for reheating (or at least mine doesn't). It gets soggy and for some reason the cheese doesn't melt, it runs. It still tasted great, but reheated Lasagna is never the same as fresh cooked. Some foods do well reserved, Pizza can be reserved cold or reheated and lose very little of the original "wham, this is good!" This really bothered me, and I wasn't fully enjoying the meal, or at least as much as I could. So, as I had a few lunches that I could experiment with, I did some experiments.

At work I have access to a toaster oven, which does all of the typical toaster oven functions. Toasts, broils and goes up to 450 ºF. But fortunately, it is not located in the lunch room where I eat (rather it is relatively close to my desk, which is where I don't eat, but rather where I work before eating), and the containers that I transport the food to work are plastic, which unfortunatly means that for that "just melted" cheese taste, I need to get some of that freshly melted plastic taste and smell.

My solution? I lined my container with foil! Now don't think I shoved the plastic container wrapped in foil into the toaster oven, 'cause that would be stupid. I would have melted plastic on my foil enclosing my Lasagna, not a tasty combination. I instead removed the foil liner with the Lasagna in it, and placed that in the toaster oven near my desk for 15-20 minutes. I initially tried 350 ºF, but quickly found out that that was too high of a heat and some of the cheese started charring a little ( I noticed it before the charring led to a bad taste, which, is a fine line between good tasting charred and bad tasting burnt). I then turned the temperature down to 200 ºF and let it sit there until I was ready to go for lunch. I grabbed the foil out of the oven and back into the plastic container and headed up to the lunch room.

When I started to eat the Lasagna, it was like eating it straight out of the oven again, there were crispy parts, a nice browning on the cheese, the layers were well heated and not soggy. I was in reheated lunch heaven.

The problem with this in general is that, I am lucky enough to have a toaster oven conveniently close to me that I can shove food in before I go for lunch. So I can keep a semi-close eye on it while I work before going for lunch. I imagine for most people that this isn't the case. For those of you out in Internet land that only have the toaster oven in the lunch room, or worse yet, only a microwave. The only thing I can say is, I'm sorry for your loss, but if you can solve the reheating problem, then I would be more than happy to hear from you.

Sunday, September 18, 2011

Funeral Potatoes

There are very few meals that I seem to gorge myself on. The two that come to mind are my mothers Honey Garlic Ribs on Rice (something I have no problem making on my own) and her Funeral Potatoes. My aunts and make them just as well as my mother, but every time I try to make them, even following the same recipe, I fall very short of the mark.

Now I know what your thinking, Funeral Potatoes? What am I doing eating this on a semi-regular basis? Well, a long story short, I've heard this dish called by a number of names, but Funeral Potatoes is what I call it because I liked the name. No I'm not morbid or anything, I just thought it to be a fun name to give to something I enjoy so much. My Aunts and mother all call it a potatoe casserole, but whatever you call it, it is delicious!

All it really is, is hashbrowns in a cheese sauce with buttered cornflakes crushed on top.

You would think that something so simple sounding could be made by anyone! But apparently I am not in that grouping.

Either way, whenever I visit my family and Funeral Potatoes make an appearance on the dinner table, I either finish them all off (which is harder to do now that my Mom has been making more for the meal), or I end up taking a doggy bag home with me. They aren't as good when reheated for a lunch, but they still get ranked really high up on the list of favorite lunches.

Tuesday, September 7, 2010

Roasted Red Pepper Hummus

A friend of a friend, both of which are friends of mine, requested this for her birthday party. It is the first flavoured Hummus that I have ever made, and I learned a whole bunch about how added flavours interact with the base taste. Namely, I need to add more if I want it to have a distinct flavour!

For those of you who don't know, Hummus has a few different uses. It can be used as a sauce, a spread, and a dip. I've seen it used quite successfully on a vege-burger, though I personally prefer to eat it with assorted crackers.

Depending on what you are using as your base (Garbanzo beans or Chickpeas, dried or canned) you may need to take a few extra steps. I used dried Chickpeas and as such I had to boil them until soft (about 1-2 hours)


The water the Chickpeas were boiled in is saved and used to thin the Hummus when everything is blended together.


While I was letting the Chickpeas cool a little, I roasted some red peppers and coarsely chopped them. In retrospect, I shouldn't have chopped them as the next step was to blend everything in a blender. I could have roasted the pepper and then just tossed it in. It was an unnecessary step that I apologize for.


Blend the Chickpeas, Peppers, and all the other ingredients (Garlic, tahini, lemon juice and cumin). Once pureed, move to a storage or serving container and sprinkle with Paprika. Paprika is typically made from dried and powered red peppers so aside from making it look nice it will also add flavour.


Hummus
About 2 cups
You may substitute one 16-ounce can chickpeas, rinsed and drained. Use water to thin the puree as necessary.
Pick over, rinse and simmer:
3/4 cup dried chickpeas
Drain and place in a pan with water to cover by 5 cm. Bring to a boil, reduce the heat, and simmer until very tender, about 1 1/2 hours. Drain, reserving the cooking liquid. Transfer the chickpeas to a food processor or blender and add:
1/3 cup fresh lemon juice
3 tablespoons tahini (sesame paste)
2 garlic cloves, finely minced
(1/2 teaspoon ground cumin)
salt
Puree until smooth, adding 2 to 3 tablespoons of the cooking liquid as needed to obtain a soft, creamy consistency. transfer to a shallow serving bowl and garnish with:
1 tablespoon olive oil
1 tablespoon finely chopped parsley
Sprinkling of hot or sweet paprika

Unfortunately I don't have a recorded cost for most of the ingredients that I used, so I can't give a cost associated with the final dish. I apologize and I'll keep an eye out for prices so that I can update this post in the future.

However, I do know the ingredients and I have access to Wolfram Alpha, so I can provide the nutritional information. I made the wild assumption that a single serving would be 15 mL or an ample amount to spread on a single cracker.

Friday, August 13, 2010

Roasted Tomatoe Sauce

This is a basic tomatoe sauce that I have grown quite fond of in Lasagnas. The only drawback is that it takes a long time to actually make the sauce. This means that if I have limited time, I can't make a Lasagna. Which is why I am making it beforehand. I can start thawing the sauce the day before or morning of and I will have sauce that is ready to go.

Before I began, I weighed all the vegetable ingredients and recorded it. This was to create a baseline of how much I start out with, compared with what I will get out. The number I got allows me to know the total weight of the ingredients that I will need to use to make a given volume of sauce for future reference. I prefer using weights to saying "use a medium onion", its more accurate and leads to repeatable results.
Tomatoe - 4408 grams (9 lbs 11 oz)
Onion - 271 grams (9.6 oz)
Red Pepper - 167 grams (5.8 oz)
Garlic - 50 grams (1.7 oz)
This is equivalent to 12 large tomatoes, 1 Onion, 1 Red Pepper and 1 bulb of Garlic. I ended up with a sauce that I had to thicken, so I would recommend reducing the weight of the tomatoes by choosing medium sized tomatoes instead.

This was the first time I used Beefsteak tomatoes and I ended up with way more sauce than I was expecting. So much in fact that I would actually double the weight of the Onion, Red Pepper and Garlic or half the Tomatoes. I must mention that this is the first time I have weighed the ingredients when I make this sauce. So I didn't see the excessive volume coming until the final measurement.

The first step is to wash off waxes, pesticides and anything else that may have made its way onto the tomatoes.


In the name of science I measure you! Depending on how thorough you want to be you can either use 12 medium sized tomatoes (I used large ones to make this recipe, much to my dismay). A single medium Red Pepper, a single medium Red Onion and a single bulb of Garlic (note: I mean bulb not clove).


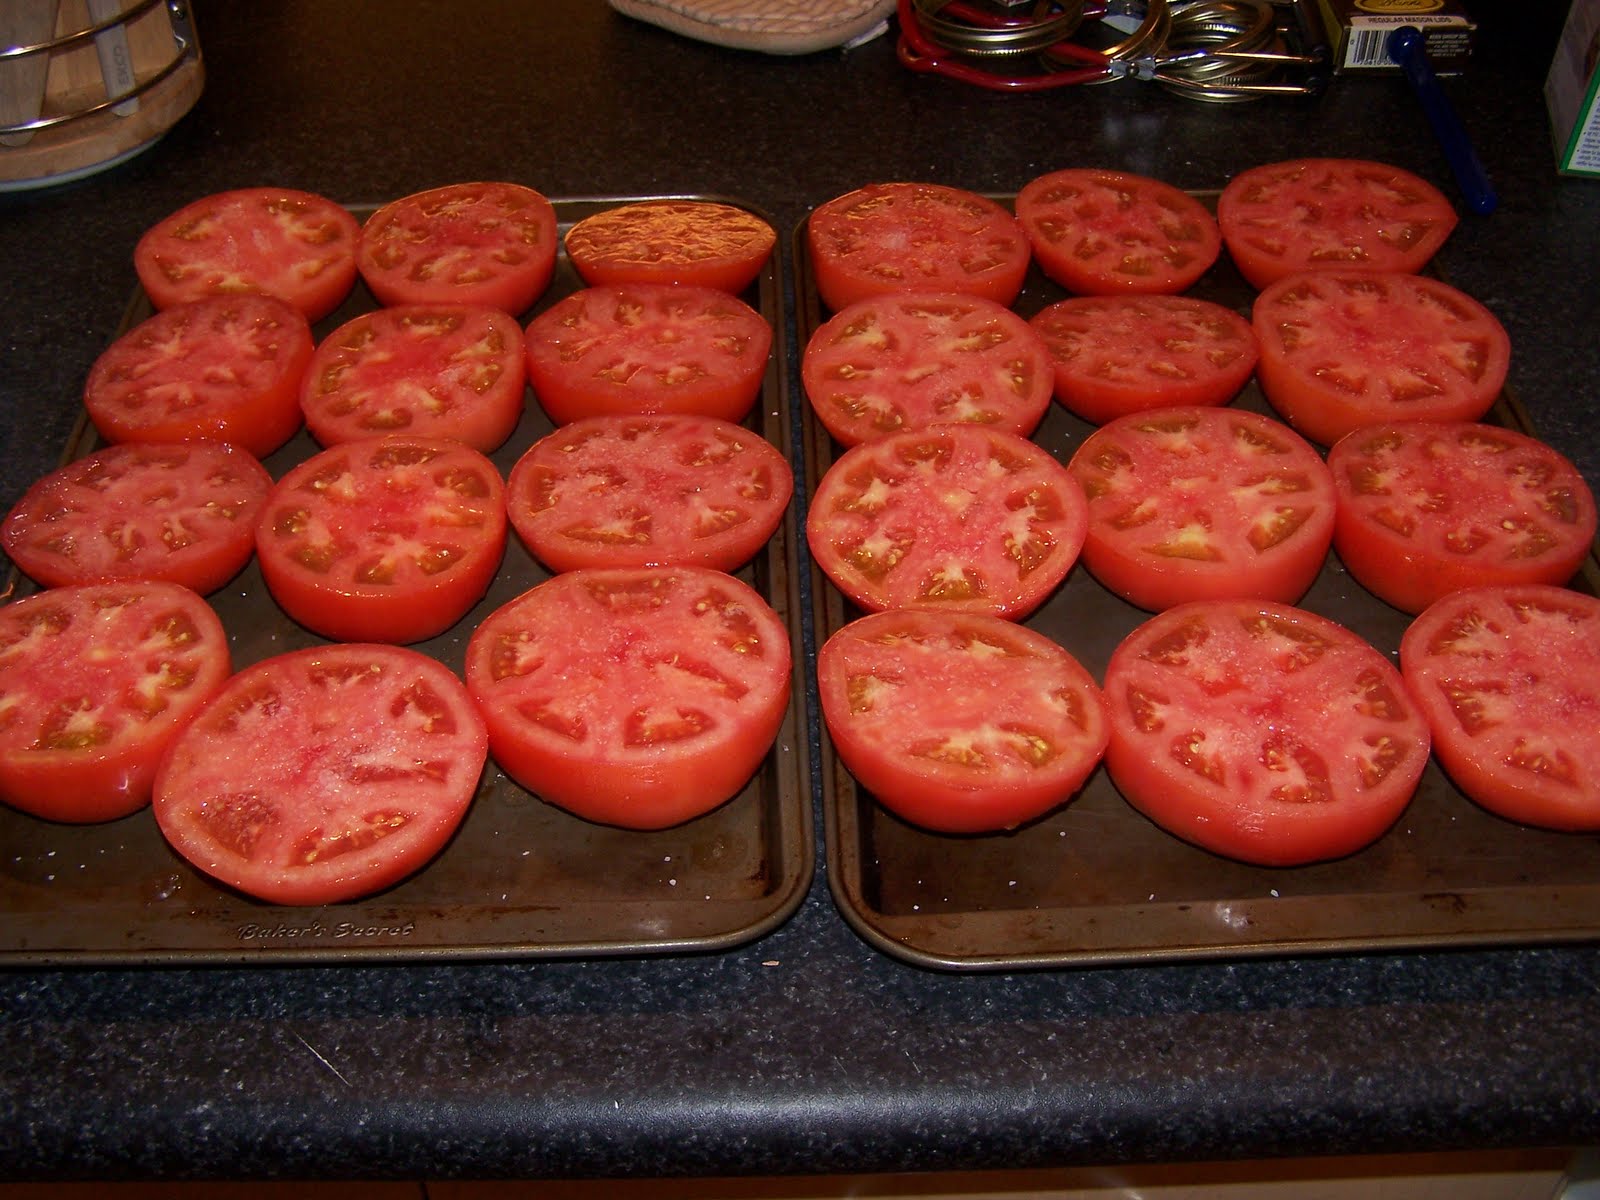
Cut the tomatoes in half and arrange with the insides facing up onto a pair of flat sheets. I tried this once in a cake pan and it still turned out. The moral of this story is, the heat is coming from a broiler which is heat coming from one direction only; up. So use whatever is convenient. Brush the insides of the tomatoes with Olive Oil and then sprinkle with Kosher Salt.


If I had to guess at how much Olive Oil I used, I might say 30 mL (1/8 cup or 2 tbls). Kosher salt has big flakes, which make it ideal to stick to a surface when used for seasoning. In this case it does double duty and helps pull moisture out of the tomatoe. I also enjoy the taste of Kosher salt compared to regular table salt.


 Place the rack in your oven as high as it goes, you want the tomatoes to be directly under the broiler. The goal is to char the surfaces.


I turned the broiler on Hi (some oven models only have one setting for the broiler, others, like mine have two settings. Still others have the ability to set a temperature) and left the oven door slightly ajar (some oven models allow you to properly broil with the door closed, mine requires it to be open). I left the tomatoes alone for half of an hour, at which point I checked to make sure they were cooking evenly and rearranged as was nessecary (either by turning the trays by 180 degrees or by moving tomatoes. I put it back into the oven for another 15 minutes to let them finish cooking.


Using a pair of tongs, flip the tomatoes over. Then repeat the brushing of oil and sprinkling of salt. You will notice a brownish liquid in the pans, don't spill this or remove it. There is a lot of flavour stored in this and it will increase as the cooking goes on.


Just like with the other side, check after a half hour, turning trays or moving tomatoes to make the tomatoes char more evenly. Then put back in for another 15 minutes to cook the rest of the way. I was distracted by something shiny and the tomatoes in this photograph charred a bit too much, but not so much that it would ruin the sauce.


While the tomatoes were roasting, I was preheating a heavy iron skillet (mine is cast iron, so it doesn't get much heavier) on high heat. I sliced up a Red Pepper and gave it a thin coating of Olive oil, then I proceeded to sear them in the skillet. I then repeated the same for the Red Onion and then again for the bulb of Garlic. I recommend constantly moving the slices around so that they won't burn. However if you have to go off and do something else or like me get distracted by shiny things, as long as you can hear a sizzle coming from the pan, your food is safe. The sizzle is water being drawn out and boiled away, this limits the temperature to 100 Celsius (212 Fahrenheit) which won't allow it to burn. However when the sizzle stops it will burn. I let each vegetable sizzle while I sliced the next one to go into the pan. I periodically flipped the slices with a pair of tongs.

Toss everything into a blender, if its too much to fit into the jar then put only what will fit into it. I pureed all of the vegetables into a sauce. I also made sure to add the liquid that was pooling in the trays to the blender. Once the sauce is blended, I poured the sauce back into the trays and let it sit for a few minutes before using a flat edged wooden spatula to scrape up whatever residue were left behind on the trays. If the sauce is thick enough you can either use it or store it.

However, if the sauce is too watery, you can reduce it on the stove by setting it to a simmer and slowly reducing it down to the consistency you want.


Total initial ingredients - 4896 grams (10 lbs 12 oz)
Sauce (Prereduction) - 2562 grams (5 lbs 10 oz)
Sauce (Postreduction) - 2188 grams (4 lbs 13 oz)
2 Liters final product
 Here is the sauce in the Joy of Cooking recipe format.

Roasted Tomatoe Sauce
1 liter


Cut in half:
12 medium tomatoes
Brush the inside with:
2 tablespoons olive oil
Spinkle with: 
Salt
Place the tomatoes under the broiler. Turn with tongs as the skin chars, repeating the brushing with oil and sprinkling with salt. When charred all over, remove and let cool.
In a heavy skillet sear:
1 medium red pepper (sliced into strips)
1 medium red onion (sliced into eights)
1 bulb of garlic
Add the tomatoes and then puree in a food processor or blender.


The total cost is $15.55, which works out to $0.97 per serving.